
Many players prefer, for convenience and ease of play, to have some form of shortcut to frequently used actions or spells. There are two ways of achieving this aim, the first is through the use of desktop icons in the classic client or hotbars in the enhanced client. The hotbars are a more versatile option, being one of the feature that justify that client in its name of ‘enhanced’. The alternative method of creating shortcuts is through macros which will be dealt with on the page ‘Creating Macros‘, although in enhanced client these methods can be combined as icons representing a created macro can be placed in a hotbar slot.
Desktop Icons
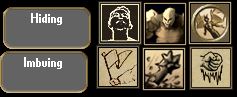
Desktop icons can be created in the classic client from the following sources:
- Spellbooks
- Special Moves Book
- Skills list
- character Abilities Book (Gargoyles only)
To create a desktop icon from any kind of spellbook, open the book and turn to the correct page for the spell required, drag the spell’s icon to anywhere on the desktop. Double click the icon to cast the spell.
![]() The special moves book is found by the character’s feet in the paper doll . Open the book to access the special moves icons, drag them to the desktop exactly as for spells. These icons will update depending on what weapon you have equipped.
The special moves book is found by the character’s feet in the paper doll . Open the book to access the special moves icons, drag them to the desktop exactly as for spells. These icons will update depending on what weapon you have equipped.
![]()
Skills that show in the list with a blue gem beside them can be dragged off to the desktop. Click on the skill in the list and drag horizontally (sideways)
![]() Each character also has on the paperdoll the ‘character abilities’ book, opening this book shows icons for the character’s abilities. For Elves that would be ‘nightsight’ and ‘infused with magic’ for Humans ‘strong back’ and ‘tough’ for gargoyles ‘flying’ and ‘berserk’ of all these icons only one can be pulled off to the desktop – gargoyle flying. This toggles between flying and walking when double clicked.
Each character also has on the paperdoll the ‘character abilities’ book, opening this book shows icons for the character’s abilities. For Elves that would be ‘nightsight’ and ‘infused with magic’ for Humans ‘strong back’ and ‘tough’ for gargoyles ‘flying’ and ‘berserk’ of all these icons only one can be pulled off to the desktop – gargoyle flying. This toggles between flying and walking when double clicked.
Hotbars

Icons can also be placed on the desktop in the enhanced client, but instead of being placed individually anywhere on the viewing screen they are organised into hotbars. A new character is created with three hotbars, each having 12 slots. The default hotbar containing menu actions cannot be deleted, though the icons in it can. A second hotbar has hotkeys set to the keyboard’s ‘F’ keys and the third has no icons nor hotkeys.
Hotbar Options
Hotbars have a maximum of 12 slots, but they can also be reduced by use of the arrow at the far right to any number between 1 and 12. Dragging the arrow all the way to the left and then down will allow you to have a vertical hotbar instead of horizontal.
The tab at the left of the hotbar allows you to move the hotbar around the screen, the lock on the tab prevents it from being moved. The small triangle arrow on the tab closes the hotbar, right clicking on it gives the further options of closing to right, change the handle color, set text, text on opposite side.
When hotbars are placed together, creating a group, the entire group can be moved by holding shift, clicking anywhere in the group and dragging, even if the individual bars are of different sizes. To close the entire group hold shift while clicking on the close arrow of any bar in the group.
Right clicking in an empty hotbar slot, or a hotbar slot where there is no ‘targeting’ option, gives a context menu with the following options:
- Lock Hotbar – this removes the tab and prevents icons being removed from the hotbar (if the bar is locked this option becomes ‘unlock’)
- New Hotbar – this opens a dialogue box allowing you to specify the number of slots you require in the hotbar
- Enable Auto-hide – causes the hotbar to fade from view after a few seconds, only becoming visible again when you mouse over its location. (when autohide is enabled this option becomes ‘disable auto-hide)
- Assign Hotkey – sets the keypress which will activate whatever icon is in the hotbar slot you clicked on
- Clear Item – removes the icon from the hotbar
- Set Border – there is a choice of 10 different button frames you can choose
Right clicking on a hotbar slot containing an action or macro icon which requires a target gives the option to choose the target types ‘self’, ‘cursor’ ‘stored’ ‘current’. A border around the icon denotes which target type has been chosen. Blue denotes ‘self’, green denotes ‘cursor’, red denotes ‘current’, gray denotes ‘stored’. Right clicking a hotbar slot containing a repeatable action gives an option to to enable, or disable, repeating
Sources
Hotbar icons can be created from the following sources:
- Spell books
- Special Moves Book
- Skills List
- Character Abilities Book (gargoyle only)
- Character Sheet
- Actions List
- Macro
As in the classic client, open the spellbook, special moves book, skills list etc and drag the relevant icon. The special moves icons are found with the character abilities list, top left of the paperdoll with the character sheet opposite, top right. The actions list and macros list are opened via an icon in the default hotbar.
In addition items can be placed in hotbar slots. Stackable resources such as reagents, bandages etc will show a count. Single items such as scissors, crafting tools provides a shortcut to use the tool. An example of using items in hotbar slots might be bandages, target set to ‘stored’ where the stored target is a hunting partner, assign a hotkey. Pressing that key will automatically bandage your hunting partner without you needing to click a targeting cursor on him (provided you are close enough).
The actions ‘scale mode’ and ‘alpha mode’ found in the ‘other’ section of the actions menu can be used to resize the entire bar or increase transparency.
Blockbars
![]() A blockbar is a handle-less, single slot hotbar. You can create a blockbar by holding control and clicking on an icon in your spellbook or skill list, or on an item in your backpack (except when in legacy view). While holding ‘ctrl’ left click the icon, or item, and drag the created blockbar to the required location. A blockbar can be converted to a regular hotbar by clicking on the lock and then dragging the arrow.
A blockbar is a handle-less, single slot hotbar. You can create a blockbar by holding control and clicking on an icon in your spellbook or skill list, or on an item in your backpack (except when in legacy view). While holding ‘ctrl’ left click the icon, or item, and drag the created blockbar to the required location. A blockbar can be converted to a regular hotbar by clicking on the lock and then dragging the arrow.
Labelbars
Labelbars are created by holding ctrl and left clicking on an icon from your character sheet, drag the created bar to the required location and left click to place it, choose ‘lock window’ from the context menu.![]()
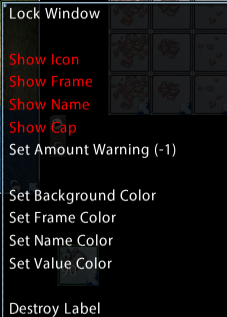 The bar can be customized, and can even be locked to your character, moving around the screen with you, without impacting on your interaction with the character.
You can also use the actions ‘scale mode’ and ‘alpha mode’ as with hotbars.
Note, the ‘amount warning’ tracks decreasing amounts, so is useful for tracking hit points, stamina, even luck etc, but is not helpful for tracking increasing weight.